Digging lugworm – methods and tips
You can buy the fanciest tackle and invent the most sophisticated rigs , but that’s all pretty useless if you can’t source the right bait. The ‘right bait’ in my neck of the woods, especially when I’m after winter cod in rough seas, is fresh lugworm. Digging your own lugworm is not always a matter of choice like ‘making your own bread’, it’s often the only choice you have. It’s either digging or blanking. Digging lugworm in winter without any experience can be back-breaking and frustrating but there are a few ways to make it easier.
Black or blow?
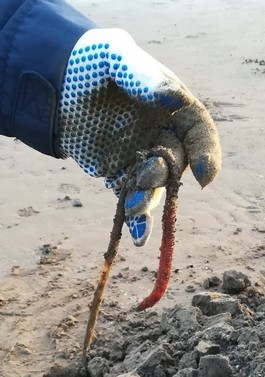
First of all, there are two species of lugworm: blow lugworm (Arenicola marina) and black lugworm (Arenicola defodiens). Black lugworms are often found closer to the low water mark and can be successfully collected with a bait pump. Unlike blow lug casts, the casts of black lugworms are much neater and smaller and not accompanied by a depression (blow hole) and are therefore much harder to find. Black lug can be very deep, especially in the winter, which makes it especially hard to dig for them. Black lug can usually only be dug or pumped during the bigger tides. I might return to the topic of collecting black lug later, but for now I will concentrate on how to dig for blow lugworm.
Lugworm digging tools
The fork
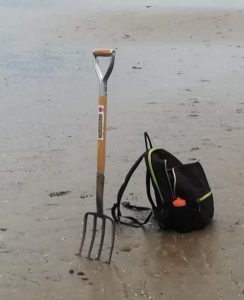
The best tool to dig for blow lugworm is a potato fork, because the flat prongs are less likely to pierce the worms. It’s worth investing in a good quality fork because it has to take quite a bit of abuse. Also, make sure the handle length suits your body height. I can recommend this one, from Spear and Jackson.
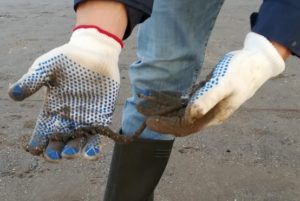
Gloves
To prevent blisters, you will also need a pair of working gloves. They need to be strong enough to protect your hands, but still thin enough to handle the worms.
Buckets
You will need at least two buckets or tubs: one for the worms that are damaged, one for the undamaged ones. If you mix the broken ones with the others, the released juices make the other worms die a lot quicker. It is also a good idea to have a bucket with sea water ready to wash your hands or rinse the worms. Buckets with lids are ideal. That way you can cover the buckets when it starts raining (fresh water will kill the worms). It can also help to protect the worms from free running dogs (yes, they eat anything…).
When to dig for blow lugworm
Obviously you can only dig for lugworm when the tide is out. That means from two hours before until two hours after low tide in most areas. (The window for black lug is a lot smaller.) In the winter, when the worms are deep, it can be easier to dig when the tide is coming in because the worms come up a bit. The time of the day doesn’t really matter. With a good head torch, you can even dig in the dark.
Locating the worms
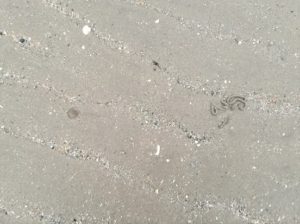
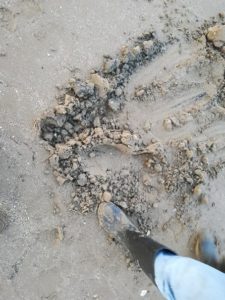
To locate the worms look for casts. The area with the highest density of casts is not always the best digging area. Areas with a lot of thin casts, usually higher up the beach, are called nursery beds. These worms are tiny and are better left alone. Once they mature, they move further down the beach.
The best area to dig for blow lug is somewhere halfway between the high and the low water mark (on a big tide). Look for areas with casts that are slightly thicker, these are usually the better worms. Blow lugworm live in U shaped burrows with a cast on one end and a blow hole on the other. If you can determine which blowhole belongs to which cast it’s a lot easier to guess the position of the worm. The depth of the worm varies with the season. In the summer they can be less than ten inches from the surface while in the winter it could be several feet.
No casts, no worms?
If you don’t see any casts, that doesn’t necessarily mean there are no worms. If the tide is just going out, less casts will be visible. Rain and wind also have an influence. I’ve had quite productive lugworm digging sessions with hardly any casts showing.
Lugworm digging methods
There are roughly two ways to dig for lugworm: individually or in trenches. Which method works best depends on the circumstances and the fitness of the digger.
Digging lugworm individually

To dig lugworm individually you have to connect a cast to a blow hole. Start digging from the blow hole towards the cast, gradually deeper but not too deep or you might damage the worm. Stop a few inches before the cast. Then, for the final scoop, push the fork behind the cast as deep as you possibly can and lift the section of the burrow with the worm in it.
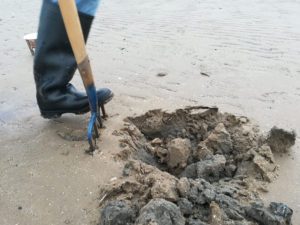
Sweeping the heap of sand back into the hole with your boot will only take a few seconds, but will be welcomed by other beach users.
Pros

- Easy on the back
- Least chance of damaging worms
- The worms are generally of a good size
- Missed worms are rare
- There’s no rush, you can take as many breaks between each hole as you like
Cons
- Hard on the fork and the underarms. For the ‘final scoop’, you need to put a lot of pressure on the fork handle
- You spend lot of time connecting blow holes to casts
- When there are a lot of worms it can be hard to determine which cast belongs to which hole, resulting in missed or broken worms
- Casts and blow holes are not always visible (for instance when it has been raining)
- You will need to backfill the hole, although it doesn’t take too much of an effort.
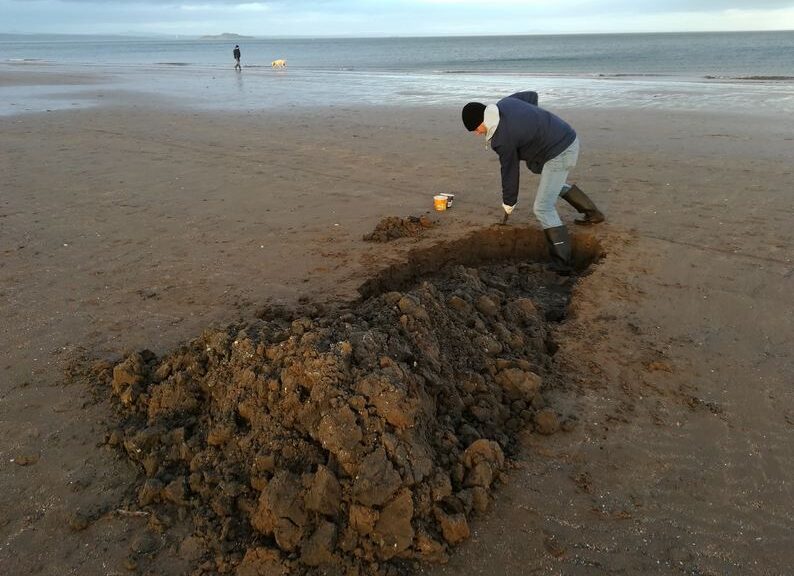
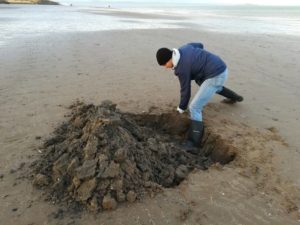
Trench digging for lugworm
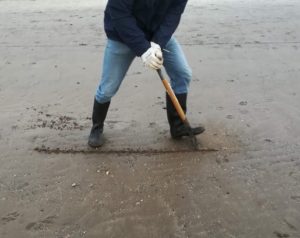
Trench digging for lugworm works best when there is a higher density of worms. I usually draw a 4-5ft line parallel to the shoreline.
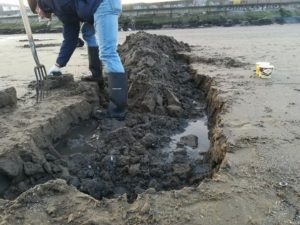
Then I dig a shallow trench next to that line. Then I move behind the line (with my back to the sea) and deepen the trench, piling up the sand behind the line I drew in the sand. I’m not looking for worms yet, the trick is to do this as quickly as possible, to prevent the hole from filling up. Moving backwards, I gradually deepen and widen the trench, piling up the sand in front of me.
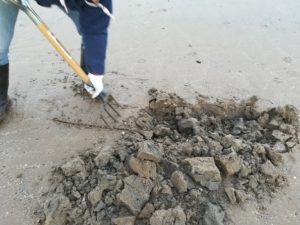
Once the hole is big and deep enough, you can start collecting worms when they appear. Make sure you have your buckets nearby, so you can collect the worms without losing too much time. Pace is key. You can’t afford to stop digging for too long or your hole will fill up and you can start all over again. Trench digging is a lot easier in pairs: one digs, while the other collects the worms, swapping places regularly.
Pros
- Most of the time quicker than digging individually
- No time wasted by matching casts and blow holes
- Easier on the fork and the underarms
- Easier to reach a decent depth
- You get a good work-out without having to go to the gym
- Sometimes you get interesting by-catches, like the precious white rag worm
- You are backfilling the hole while you’re digging, without any extra effort.
Cons
- Physically very demanding.
- More ‘work’. Although it is often quicker than ‘spot-digging’ a lot more sand needs to be moved for the same amount of worms.
- Worms are missed much easier, especially when you’re digging on your own
- Broken worms are a more common, although this becomes less with experience
- Unless you’re digging in pairs, there’s no time to take a break. The hole will fill up and you will have to start a new trench.
Other lugworm digging tips
Digging for lugworm is a bit like fishing: weather conditions play a big part and you never know what you’re going to get. The place were you find loads of ‘pennel fillers’ on one day, can be complete rubbish the next. But there are some ways to improve your ‘catch rate’.
Take notes
It’s a good idea to keep track of your lugworm digging results. Where and when and at what stage of the tide. The more information you have gathered the easier it will be to decide where to dig and when. For example, some lugworm beds might only be uncovered during the bigger spring tides.
Adjust your methods to the conditions
When it’s raining and there are hardly any casts visible, there is no point in spot digging. Likewise, when the casts and blow holes are clearly visible but very spread out, there is no point in breaking your back digging trenches. As I mentioned before, if the worms are very deep, like in the middle of the winter, it can be a lot easier to dig once the tide starts coming in.
Vary your lugworm digging grounds
When you dig in the exact same spot every time, eventually there will be very few worms left. This is especially true in small areas with limited beds. By giving lugworm beds time to recover, you make sure you have a place to dig in the future.
Think of other beach users
As I mentioned, you should always backfill your holes. Not only they look bad but they could potentially be dangerous (e.g toddlers playing in shallow water in summer). If the council gets a lot of complaints, you might lose the chance to dig on those beaches in the future.
Storing lugworm
How you store your lugworms largely depends on space and tolerance of family members. In an ideal world you have a separate bait fridge in your garage/shed. If you don’t, the best way store them is in cat litter trays filled with a few millimetres of seawater. Ideally this water should be changed every day. You can store some bottles of seawater in the fridge.
Storing lugworm in newspaper
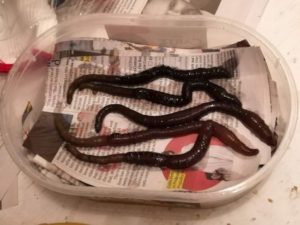
In a less ideal world, storing them in newspaper is the way to go. I store them in ice cream tubs in the fridge. Cut some newspaper to the size of your ice cream tub. Add a few layers at the bottom, then add a few worms (3-6, depending on size) then more newspaper, worms again, etc. until the box is almost full. If you change the newspaper every day and store the boxes in the fridge, the worms will keep for up to a week. If your partner opposes to having worms stored in the general fridge, you can label the boxes with something like ‘Mum’s strawberry jelly attempt’. Be creative. The good thing about storing lugworm in newspaper is that it toughens them up a bit, making them easier to handle.
Freezing blow lugworm

Unlike the tougher black lugworm, blow lugworm doesn’t freeze that well. I prefer to use fresh lugworm, but I always have some left-over frozen lugworm for emergencies. It’s a lot easier to freeze blow lugs when they have been on (regularly changed) newspaper for a few days, because the skin gets tougher. I prefer to freeze them in ‘bait-size’ portions, several at a time, wrapped in cling film and then stored in freezer bags. I only take the frozen lug out of the freezer at the last moment so they’re still partially frozen when I use them. Instead of threading then, I simply wrap them to the hook with bait elastic, creating a firm-ish lugworm sausage. Like I said, I prefer fresh, but I’ve caught plenty of good fish this way.
I hope this article was useful to you. If you have any lugworm digging tips you like to share, please do so in the comment section below. Tight lines!
And if you’d like to receive an email every time I publish a new post, please subscribe to my newsletter. Tight lines!
Disclosure: if you purchase anything using the links in this blog post, I might make a commission. Affiliate programs and affiliations include, but are not limited to, the eBay Partner Network. It doesn’t cost you a penny more to buy via these affiliate links (and you don’t have to use them of course) but it helps me to keep this blog going. Thanks!
2 thoughts on “Digging lugworm – methods and tips”
Thanks m8… I found ya site for a refresher as I’m back on the mudflats this autumn/winter and I’m trying out the pump method, I had a recce out near the low water mark simply to see if there was any bait out there ( yep there is) but not as plentiful as we’d all like to see,so I’ve decided to give the pump ago….my patch is off of Southend on sea Essex, many many moons ago I used to bait dig for the local tackle shops in my area but now there is only one left… Southend Angling centre…still run by Roy…
Thanks for your comment. Yeah, it can take a bit of time to dig enough lugworm for a session, especially deeper into the winter. Still worth the effort though! Nothing beats fresh lug if that’s what they’re after. Hope you have a productive season!